Sunday, 28 February 2010

Box of Chocolates


Ahhhhhh, sweet February, commonly thought of as the month of love. How perfect would it be to offer a sweet box of chocolates to your sweetheart? Yes, I know that Valentine's Day has come and gone, but I still have one more day before it is no longer the month of February and I'm sticking with the love theme until the last possible minute.

I actually made these tasty treats back in August for the celebration of our 15th anniversary. Imagine how hard it is to find pink and red candies and a heart shaped chocolate box in the month of August. The guy at the local candy store finally had pity on me and let me buy one individual chocolate instead of one pound of chocolate so that I could buy a velvet heart shaped candy box.

So what is so special about these chocolates . . . they are cupcakes, of course. The idea is from the book Hello Cupcake which has sooooo many fun cupcake ideas. Since my husband is not a huge fan of chocolate I decided to make the mini cupcakes using a yellow cake mix. The back of the book has several different recipes for homemade cupcakes as well as ways to spruce up boxed cupcakes. I used both dark chocolate and milk chocolate frostings. The dark chocolate frosting was warmed in the microwave to make it look more like a ganache and then the edges were rolled in colorful jimmies. The milk chocolate frosting was smoothed over the top of the cupcakes and then large marshmallows, cut in half and then dipped in dark chocolate, were added to the top and then swirled with milk chocolate or vanilla frosting.

These were so fun to make and I enjoyed seeing my husband's face when he saw these sitting on the table the next morning. Don't you love it when you are able to do something that comes as a complete surprise to the recipient.

Thursday, 25 February 2010

Cranberry Pecan Salad


Cranberry pecan salad is a great partner to many different main dishes. The unfortunate thing is that I like to use candied pecans and we only get them during the local street fair in the spring or around Christmas time. We have learned to stock up when these events happen, but it is a sad day when we get to the end of our stash and we still have to wait until the next opportunity comes around to buy more.

Side note: The salad above is pictured without the blue cheese dressing.

Cranberry Pecan Salad
(adjust ingredient amounts based on your preference)

green leaf lettuce
diced apple
dried cranberries
candied pecans
blue cheese dressing

Almond Chicken with Green Beans


Do you remember long before the invention of the internet when cooks and bakers actually had a special place where they kept their recipes? It might have been a notebook, binder, recipe box, or special drawer where they kept their treasure trove of tried and true recipes, as well as those recipes that looked so scrumptious they vowed that they would have to try it one day. 

Well, I have such an item. It is a notebook that looks like your average grade school three ring binder, but the secret lies in what is in the inside of the notebook. Lift the cover and you'll find oodles of recipes that have been collected over the past 15 years, ranging from appetizers, to salads, to main dishes, to cookies, all the way to desserts. Back before Mr. G.oogle, I used to clip out recipes from magazines and newspapers that would catch my eye. 

The following recipe happens to be one of those that caught my eye many years ago. It has been sitting in my recipe notebook for years just waiting for the day that I would open up to the main dish section looking for a healthy, new chicken recipe. Imagine my surprise when it was so easy and so tasty that it became a regular rotation on our bi-monthly menu. And now, I give you Almond Chicken with Green Beans. Enjoy!

Almond Chicken with Green Beans
Makes 4 servings

4 boneless skinless chicken breasts
1/4 cup zesty italian dressing
1 cup chicken broth
2 cups green beans, trimmed, halved
1 pouch long grain & wild rice (Uncle Ben's - 90 second)
1/4 cup sliced almonds

Toss chicken with dressing in resealable plastic bag. Add chicken with dressing to large nonstick skillet (or skillet with slightly heated olive oil); cook on medium-high heat for 4 minutes on each side or until browned.

Stir in broth; bring to boil. Cover. Simmer 10 minutes. Add beans. Cook 5 minutes or until chicken is cooked through. While chicken is cooking, heat rice in microwave (or cook rice if you are using another type).

Serve chicken and green beans over rice. Sprinkle with almonds.

Monday, 22 February 2010

Whole Wheat Penne with Chicken and Spinach

 
Yum!!! I could not seem to stop eating this. Seriously. I ate a bit before I served it, I ate quite a bit when I served it, I ate a bit when I dished up leftovers, I ate a bit when my husband came home and tried it, and I ate a bit for lunch the next day. I will definitely be making this again. Super easy, yummy, healthy, and inexpensive. Enjoy!


Whole Wheat Penne with Chicken and Spinach
Source: betterrecipes.com


4 small chicken breasts
10 slices turkey bacon
1 small box whole wheat penne pasta
1/3 cup extra virgin olive oil
2 garlic cloves, minced
3 tablespoons dried Italian seasoning
4 cups fresh baby spinach
1/2 cup parmesan cheese

Grill or bake chicken breasts; once cool, cut into cubes or tear into chunks. Cook turkey bacon until crisp, then break into small pieces. Boil water and cook penne about 10 minutes; drain. Add olive oil to a large pot; add minced garlic. Cook on low for 2-3 minutes. Add pasta, chicken, bacon, Italian seasoning, spinach, and parmesan cheese to pot; cook on low heat until spinach had wilted (I had to put a lid on mine). Toss to combine all ingredients. Serve hot, or chill and serve cold.

Friday, 19 February 2010

Lemon Layer Cake with Raspberry Filling


Back in the summer when I was looking for unusual salt and pepper shakers for Ron's chess set I found cute little heart shaped pans. I wasn't sure what I would be using them for, but I knew that at some point I would be using them. I mean, if anything, you can always use a heart shaped pan in February, right?

When trying to narrow down the field of recipe choices I had to do some serious contemplating. Valentine's Day equals chocolate to most people; however I had just baked two chocolate desserts in the recent past and knowing that my husband is not a huge chocolate fan I had to think outside the box a bit. I knew I wanted to bake mini cakes, could not do chocolate, am not a big fan of white, and did not want to bake a plain yellow cake. Hmmm, what was another option? Lemon. And what goes best with lemon? Raspberry.


I halved the recipe that I found so instead of two - nine inch round layers I baked 6 mini hearts to make three - two layer cakes. You can see that the cakes really puffed up in the center. Once they cooled, I used a serrated bread knife to level out the cakes so the layers would sit flat. A great way to sample the cake without being obvious about it! Homemade raspberry jam made a yummy and easy filling. Whipped cream was a light and fluffy addition, and some fresh raspberries were the perfect garnish.


I halved the lemon cake recipe and whipped cream topping, and used homemade raspberry jam instead of the raspberry curd. Enjoy!


Lemon Layer Cake with Raspberry Filling
Source: Mennonite Girls Can Cook

4 large eggs
2 large egg yolks
3/4 cup whole milk
1 tablespoon fresh lemon juice
1 tablespoon grated lemon peel
2 cups cake floor
1 1/2 cups sugar
2 teaspoons baking powder
1/2 teaspoon salt
1/2 cup vegetable oil
1/4 cup unsalted butter, melted, cooled
---
raspberry jam
3 cups chilled whipping cream
1/2 cup sugar
fresh raspberries


Preheat oven to 350 degrees. Spray two 9-inch diameter cake pans with non-stick vegetable spray. Line bottom of pans with parchment paper; spray again.

Whisk eggs, yolks, milk, lemon juice, and lemon peel in medium bowl to blend. Whisk flour, sugar, baking powder, and salt in large bowl to blend. Whisk oil and butter into flour mixture. Add egg mixture and whisk until smooth. Divide batter between prepared pans. Bake cakes until tester inserted into center comes out clean, about 30 minutes. Cool cakes on racks 10 minutes. Run knife around edge of pans to loosen cakes. Turn cakes out onto racks. Cool completely. Level cakes with a serrated knife, if necessary. (Can be made 1 day ahead. Wrap with plastic. Let stand at room temperature.)

Whip cream and 1/2 cup sugar until peaks form. Spread raspberry jam onto one cake layer. Place second cake layer on top. Clean jam around edges of cake. Spread whipped cream over top and sides of cake. Garnish with fresh raspberries. Chill until cold, about 2 hours. (Can be made 1 day ahead. Cover with cake dome and keep refrigerated.)

Rugelach

I was pretty sure that I posted this before, when we first learned how to make rugelach, but I can never find it when I go looking. I made these again last night for the....like, 50th time or something, in the two and half years since I learned how! We all love rugelach.

Apricot Rugelach

1 cup butter, softened
8 oz. cream cheese, softened
2 cups flour
1/4 teaspoon salt
1/3 cup sour cream (optional)
apricot jam (can use another flavor jam, raspberry is good too)
currants or raisins
cinnamon sugar

Cream butter and cream cheese together, preferably in a heavy-duty mixer. Add salt, flour, and sour cream. Mix just until the dough comes together, then divide into four pieces and shape into disks. Refrigerate for an hour or more.

Roll each disk into a neat 8-inch circle, then spread with a thin layer of jam. Sprinkle with a few currants or raisins, then sprinkle cinnamon sugar on top. Cut into 8 wedges. Roll each wedge up starting at the wide edge, leaving a pointy end at the top. Place each piece on a cookie sheet and bake at 350 until lightly golden. Enjoy while still warm!

Tuesday, 16 February 2010

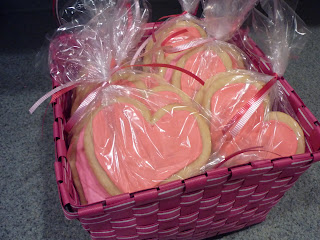
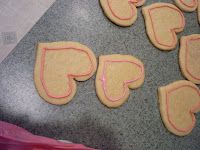
Valentine Sugar Cookies


What Valentine's Day is complete without sugar cookies, and heart shaped ones at that? We hosted a Valentine playdate with about 20 kids under the age of 5 and I knew this was the perfect opportunity to try out a new cookie recipe that would leave very few crumbs at our house. The joys of being able to sample the goods without having to eat them all!

I have to admit that while making these cookies I felt like a real baker. I mean like a real, professional baker. I had cookies in the oven, cookies cooling on racks, cookies in the fridge waiting to be baked, cookie dough being rolled out and cut, cookie dough in the fridge ready for the next roll out. It was amazing the assembly line production that got going once I got into my rhythym.


I also tried my hand at royal icing for the first time. Royal icing is a bit different than the frosting that many people use on cookies at home in that it is supposed to look more formal or professional. It was fun to work with and I'm sure as I use it more I will get better at it and be able to do more detail. I thought going into it that I was going to have all these elaborate designs on the cookies. Yah, right. I ended up getting some hearts that were passable, some that were great for a three year old, and a few in between. Enjoy!


Valentine Sugar Cookies
Source: Brown Eyed Baker


2 cups all purpose flour
1/2 teaspoon salt
1/2 teaspoon baking powder
10 tablespoons unsalted butter (room temperature)
1 cup sugar
1 large egg
1 large egg yolk
1 teaspoon pure vanilla extract

Whisk the flour, salt, and baking powder together. Set aside.

In a large bowl, beat the butter at medium speed for a minute or so, until smooth. Beat in the sugar and continue to beat for about 2 minutes, until the mixture is light and pale. Add the egg and yolk and beat for another minute or two; beat in the vanilla. Reduce the mixer speed to low and slowly add in the flour mixture, mixing only until it has been incorporated (because this dough is best when worked least, you might want to stop the mixer before all the flour is mixed in and use a spatula to blend the rest).

Turn the dough onto a counter and divide it in half. Shape each half into a disk and wrap it in plastic. Chill for at least 2 hours. (Well ,the dough can be refrigerated for up to 3 days or frozen for up to 2 months.)

Getting Ready to Bake: Center a rack in the oven and preheat the oven to 350 degrees. Line two baking sheets with parchment. Work with one packet of dough at a time; roll out the dough between sheets of plastic wrap or wax paper to a thickness of � inch, lifting the plastic or paper and turning the dough over often so that it rolls evenly. Lift off the top sheet of plastic or paper and cut out the cookies. Pull away the excess dough, saving the scraps for re-rolling, and carefully lift the cookies onto the baking sheets with a spatula, leaving about 1� inches between the cookies. (This is a soft dough and you might have trouble peeling away the excess or lifting the cutouts; if so, cover the dough, chill it for about 15 minutes and try again.) After you�ve rolled and cut the second packet of dough, you can form the scraps into a disk, then chill, roll, cut and bake.

Bake the cookies one sheet at a time for 9 to 11 minutes, rotating the sheet at the midpoint. The cookies should feel firm, but they should not color much, if at all. Remove the pan from the oven and dust the cookies with sugar or cinnamon sugar, if you�d like. Let them rest for 1 minute before carefully lifting them onto a rack to cool to room temperature.

Repeat with the remaining dough, cooling the baking sheets between batches.


Royal Icing
4 cups powdered sugar
2 tablespoons meringue powder
6 tablespoons water


Mix all ingredients on low speed for 7-10 minutes or until the icing loses its shine. Add more water by the teaspoon if it appears too stiff. At this stage you want to be able to pipe it easily.

To flood the cookies add water a few drops at a time until it reaches almost a liquid consistency.


For step by step instructions on decorating with royal icing go here.

Thursday, 11 February 2010

Cheesecake Pops


Wow, is all I have to say! This was a doozy of a baking experiment. I guess I'm one of those people that like to jump into the deep end without sticking my toes in the pool first.

Don't get me wrong. I've done plenty of baking over my lifetime and I have made many different things, but this was a hugely, time intensive project. Of course, I happened to take it on at the same time, the same day actually, that I was making Valentine sugar cookies and decorating with royal icing for the very first time, but that is another post for another time. Back to the Cheesecake Pops.

These sweet little creations were a huge test to my type a, neat as a pin, borderline OCD personality. Between the sticky cheesecake, crumbly graham cracker, dripping chocolate, and sliding toppings I literally had my hands full. Honestly, the part where I had to just let my normal perfectionist tendencies go was the chocolate dipping, dripping, wiping with a finger, licking said finger, running said finger under hot water because others would be eating these, and then sticking the pop in the stryofoam holder in the fridge while trying not to get chocolate fingerprints and drips all over the counter, floor, fridge handle, and fridge shelves. Can you tell this was a challenge for me?


So, although it was fun to try something new, I don't know if I'll be making these again, or at least not anytime soon. One of the reasons, besides what I just explained in the previous paragraph, is that when I make cheesecake and it comes out of the oven it is almost finished. You let it cool, you decorate it with whatever topping you want, and voila, you get to eat it. But with these treats baking the cheesecake is just the first step in a very long process to get your end result. Yes, you can nibble on cheesecake as you scoop it into balls, but you know there are many steps left before you get to the final product. The second reason is that there is just something inherently wrong about scooping cheesecake out of a pan and rolling it into balls like cookie dough. To me, cheesecake is like the piece de resistance to a perfect evening. It is typically something formal and elegant, not something squished around in your hand and then rolled in crushed graham crackers. And yes, for those of you that noticed the curling ribbon wrapped around the lollipop sticks, that is a bit of the OCD coming through. I couldn't very well have chocolatey fingerprints all over the sticks, now could I?


I used Bakerella's recipe for cheesecake and followed most of her suggestions, but I also made some slight modifications based on the info here. Enjoy!

UPDATED: These also taste great after freezing. I put mine in the freezer (stick and all) after wrapping in plastic wrap. They were in there for about 7 weeks before I took them out again. I set the sticks in a glass on the counter to let them thaw out. I did find that they got a little soft thawing at room temperature and they broke off the stick easily when you bit into it so I decided that I'd just go ahead and pull them off the stick for the presentation. They ended up looking like regular cheesecake balls instead of cheesecake pops but they still tasted yummy.


Cheesecake Pops
Source: Bakerella

9x13 New York Style cheesecake with no crust:
4 - 8oz packages cream cheese, softened
1 1/2 cups sugar
3 tablespoons flour
5 eggs
1 cup sour cream
1 tablespoon vanilla
1 tablespoon lemon juice

Pops:
crushed graham crackers
lollipop sticks
melted chocolate (semi-sweet, bittersweet, white, dark, milk chocolate)
shortening
jimmies, chopped chocolate, chopped nuts for topping
styrofoam block

Preheat oven to 325 degrees. Cream the cream cheese, sugar, and flour with an electric mixer on medium until light and fluffy. On medium low, add eggs one at a time, mixing well with each addition. On low, add sour cream, vanilla, and lemon juice until just combined. Pour into a 9x13 cake pan (or any other cake pan that is 2 to 3 inches tall). Bake for about 1 hour and 15 minutes. It is fully cooked if the center is still a little wobbly and the edges are firmer. Remove from oven and let cool to room temperature. Run a knife along edges to loosen from pan. Chill in refrigerator overnight.

Scoop out a spoonful of cheesecake and shape into a ball. Roll in crushed graham cracker and set on cookie sheet lined with wax or parchment paper. Stick in lollipop stick. Repeat until all cheesecake is scooped out of pan. Make room in your freezer. Freeze for 1 to 2 hours until firm.
Get your toppings ready. Melt about 8 oz. of chocolate chips in the microwave for about 30 seconds at at time. (I had to do many batches of chocolate, so be prepared to do 2, 3, or 4 batches of this). Stir in shortening (this helps make the chocolate shiny). Take your pops out of the freezer. Dip a pop into the chocolate, swirl around to try to get as much chocolate off as possible so it doesn't drip down. Sprinkle with a topping. Immediately set in a styrofoam block (or some other type of holder) in the fridge. They can be wrapped up and frozen.

Monday, 8 February 2010

Molten Chocolate Lava Cake


What better way to start my journey than with something that I have wanted to make for the past few years but kept putting off. I kept telling myself that I couldn't make true molten lava cakes if I didn't have those cute little ramekins, or at least glass custard cups. (You can actually use a muffin tin, but I wanted the authentic experience.) One of my Christmas gifts was a set of 8 custard cups and I knew then that my excuses for not making them were getting pretty flimsy. So yesterday, in honor of the Superbowl and wanting to have a slam-bang dessert to finish off our eating fest I decided to finally bite the bullet and make them.

I started my search for the perfect recipe. I found a few different ones that had amazing pictures and good reviews, but trying to narrow it down was a little difficult because they were all pretty similar. Oddly enough, our determining factor came down to serving size. As yummy as this cake is, and it is yummy, I did not want it hanging around our house for more than a day or two after making it. Too much temptation!

So, without further ado, here are Molten Chocolate Lava Cakes! **I've made it since this post, as evidenced by the photo above, and added caramel the second time around. Put batter in about half of a dish and then one or two caramels and then fill with the rest of the batter. I did one caramel but I think two would help you taste the caramel more.**


I slightly modified mine based on various reviews for this recipe. Next time I might try some type of fruit topping, along with the ice cream of course. Goodness knows I'll be making this more often now that I've seen how easy it is. Enjoy!


Molten Chocolate Lava Cakes

1 cup unsalted butter
8 oz. Ghiradelli bittersweet chocolate baking chips
5 large eggs
1/2 cup sugar
pinch of salt
4 teaspoons flour

Melt butter and chocolate in a glass bowl in the microwave for one minute. Slowly stir together with a whisk. (You want the heat of the butter to melt the chocolate but you don't want it too hot for your eggs.)

Beat eggs, sugar, and salt with a hand mixer in a medium bowl until sugar dissolves. Beat egg mixture into chocolate until smooth. Beat in flour until just combined. (Batter can be made up to a day ahead. Just cover, refrigerate, and warm to room temperature an hour or so before baking.)

Heat oven to 450 degrees. Spray 7 oz. ramekins, custard cups, or a muffin tin liberally with cooking spray. Divide batter evenly.

Bake until batter puffs but center is not set, 8 to 10 minutes. Immediately invert each cake onto a plate. Serve with vanilla ice cream or whipped cream. (In my book this is a must. How can you have chocolate cake, especially ooey, gooey chocolate cake, without vanilla ice cream. Plus it cuts down on the chocolate factor and makes it more enjoyable for tasters like my husband who isn't as big of a chocolate fan as I am.)

Sunday, 7 February 2010

The Best Way to Start

I have been perusing so many delicious recipes that I can't help but feel an overwhelming urge to bake and bake and bake, and when I'm done to bake some more! My love affair with food lies mainly in the baking realms of cakes, cookies, bars, and desserts, but I will venture out and experiment with breakfasts, lunches, dinners, and appetizers as well. Come along in my culinary adventures and hopefully you will be enticed to try the recipe yourself.