Monday, 27 September 2010

Daring Bakers - Decorated Sugar Cookies

 The September 2010 Daring Bakers� challenge was hosted by Mandy of �What the Fruitcake?!" Mandy challenged everyone to make Decorated Sugar Cookies based on recipes from Peggy Porschen and The Joy of Baking.

I knew this day would come sometime, I just didn't know when. It is the day when I hesitate to write my Daring Bakers post because I wasn't exactly thrilled with the challenge. I know, I know, and I feel terrible even typing this up. I know that our hostess worked hard to come up with a challenge, search for recipes, show examples, and give encouragement. That being said, I still really didn't like this recipe.

I'm not sure if it is because I have a great sugar cookie recipe already and this didn't exactly measure up or just because of life's circumstances those couple of days or what. I don't want to be too dreary so I'll just tell you what I didn't care for about it and be done with it. The cookies were completely blah. They really didn't taste like anything. I know that royal icing isn't supposed to have a flavor, it just adds decoration and pizazz to the cookie, but this cookie didn't have any flavor either. I also love the fact that my stand-by sugar cookie, while tasting great, also requires no refrigeration. I actually came across my stand-by recipe on another Daring Baker's blog while searching around when I was new to the club.

Okay, back to the current cookies. We were challenged to decorate a cookie based on September and what it means to us. A few years ago when I was a teacher in a public school classroom I would have chosen a myriad of school supplies or some such thing. I also thought about leaves but couldn't find a leaf cookie cutter and wasn't adventurous enough to make my own. I got to thinking and realized that while I do think of objects for September I more often than not think in terms of color. Colors for fall, like orange, brown, yellow, red, and maybe even some green are what roll through my head and flood my vision. That got me to thinking that I could use some practice on marbling colors together and just playing around with the royal icing because I've never really had a chance to do that before.


I started by using a toothpick to add some color to the icing while still wet. Once I got a feel for that, I moved on to trying out objects and designs using my fall colors. I started with the green leaf and after thinking it looked a little plain, I added some brown. I then did the same for the red leaf.


I then moved away from using white as a base, for the most part, and started swirling the other colors together to see what would happen. I had fun with this but it was a bit tedious only using little dabs of colors here and there. My designs definitely aren't perfect and there are some not quite round circles and some air bubbles in others, but on the whole I was pleased with the way they turned out.


By the time I got to these cookies I was just trying to finish. I wanted all the cookies iced and all the icing gone. I thought that they actually looked decent, for the most part, and once again realized that sometimes you can try too hard (as with the earlier cookies) and when you stop trying you might get what you wanted in the first place.

I did enjoy this challenge in that it gave me an opportunity to sit and play with royal icing for a few hours while my son was napping. I also enjoyed the fact that I didn't have to make them for anyone in particular or for any event so I could just experiment with some different techniques. I also liked the fact that I really didn't gain any calories from this challenge since I wasn't enticed to eat them.

If you would like the recipe, please email me.

Wednesday, 22 September 2010

Pasta Salad


I love a good pasta salad! They are great for potlucks, a hot summer evening, when you really don't feel like cooking, or just to munch on along with some crisp, crusty bread. There are so many different ingredients that you can add or substitute so feel free to mix it up with other stuff. Enjoy!

Pasta Salad

1 pound spiral tri-color noodles
small can of sliced olives
cherry or grape tomatoes, quartered or halved
marinated artichokes, chopped
provolone cheese, cubed
pepperoni slices, halved
Italian dressing
Parmesan cheese

Boil the noodles according to package directions. Drain, and rinse under cold water. Mix together all ingredients, adding Italian dressing and Parmesan cheese to taste. Refrigerate for at least 30 minutes. Serve.

Friday, 17 September 2010

Zucchini Bread


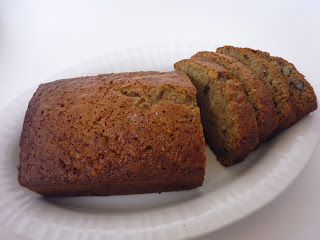
I would bet that anyone who plants squash in their garden has a recipe that they have used for zucchini bread! I, in fact, have so much zucchini that I have already used three different recipes and plan to try out a few more. The recipe that I am going to post today is my favorite zucchini bread recipe, hands down. It might be my favorite because it is the one I have used for the past 16 years, but it also might be my favorite because it is a pretty traditional recipe. Just the right combination of spices, plump raisins, and crunchy walnuts.

Speaking of raisins and walnuts, I am someone who likes my zucchini bread full of them. One of the other recipes I tried out used chocolate chips in place of the raisins, but I didn't really like that flavor combination. Now chocolate chips in banana bread is a goldmine, but not so much in zucchini bread.

This recipe comes straight out of Betty's book. In fact, I've used this page so many times for both banana and zucchini bread that the holes on my page are ripped away completely. Yes, they are that good. Enjoy!


Zucchini Bread
Makes 2 loaves

3 cups shredded zucchini (about 3 medium)
1 2/3 cups sugar
2/3 cup vegetable oil
2 teaspoons vanilla
4 eggs
3 cups flour
2 teaspoons baking soda
1 teaspoon salt
1 teaspoon ground cinnamon
1/2 teaspoon ground cloves
1/2 teaspoon baking powder
1/2 cup coarsely chopped nuts
1/2 cup raisins

Heat oven to 350 degrees. Grease bottoms only of loaf pans. Mix zucchini, sugar, oil, vanilla, and eggs in large bowl. Stir in remaining ingredients. Pour into pans. Bake 50-60 minutes (25-30 minutes for mini loaves) or until wooden pick inserted in center comes out clean. Cool 10 minutes. Loosen sides of loaves; remove from pans. Cool completely before slicing. Wrap tightly and store at room temperature up to 4 days or refrigerate up to 10 days.

Saturday, 11 September 2010

Chicken Kabobs

 
Although it is still officially summer where we live that season has pretty much ended for us. The weather has turned cooler, grayer, cloudier, and wetter and it makes you want to curl up with a good book most of those days. And while many of my cooking/baking experiences lately have been breads and muffins using up the zucchini from our garden (those posts will be coming soon), I thought I'd share a close-out meal of summer. I guess I really shouldn't say close-out meal because even when it is freezing, blowing, raining, and possibly snowing, we still use our gas grill. One of the best purchases ever made where cooking is concerned!

We did a pretty simple chicken kabob to use up some of the veggies and fruits we had sitting in our fridge. My husband was in charge of skewering the items so we ended up with a great assortment. As you can see from the kabobs on top, some have all tomatoes, all pineapple, or all chicken, and then others further down in the stack are an assortment of items on a skewer. It really is a simple and easy meal, the longest part is preparing your items to be skewered (can you tell I like that word!). Enjoy!

Chicken Kabobs
boneless skinless chicken breasts, marinated with your favorite marinade or sauce
pineapple
tomato
onion
squash
pepper