Sunday, 27 February 2011

Daring Bakers - Panna Cotta and Florentine Cookies


The February 2011 Daring Bakers� challenge was hosted by Mallory from A Sofa in the Kitchen. She chose to challenge everyone to make Panna Cotta from a Giada De Laurentiis recipe and Nestle Florentine Cookies.


I wasn't sure that I was going to like this challenge because I'm not usually a fan of cold custard type desserts, but surprisingly I liked it. I think the layer of raspberry gelee influenced my opinion of this dessert, without it I don't think I would have enjoyed it as much. The layer of raspberry gelee gave a bit of substance to each bite. I made both raspberry and strawberry, although I originally was just going to make raspberry. It was a bit of a challenge for me in that I have never made Panna Cotta nor attempted layering in this type of dessert.

The Panna Cotta was very easy to make. I made it first knowing that it would be my first layer and that I could make the raspberry gelee while the Panna Cotta was setting in the fridge. After making the raspberry gelee I realized that I had way more Panna Cotta than gelee so I dug around in my fridge and found some strawberries I had recently purchased. Voila, I made some strawberry gelee and half of the desserts were raspberry, half were strawberry and it gave me an opportunity to really experiment with presentation.

Since I had never made this dessert before there was a moment after they went into the fridge where I unsure if it would set up as it was supposed to. I was pleasantly surprised when I took them out of the fridge a few hours later and they were set enough to add the next layer. I had so much fun spending the day layering and playing around with presentation, it turned out to be an enjoyable experience in my kitchen! Enjoy!

Strawberry                                           Raspberry


Panna Cotta
Source: Adapted from Giada De Laurentiis' recipe from Foodnetwork.com

1 cup whole milk
1 tablespoon unflavored powdered gelatin
3 cups whipping cream
1 whole vanilla bean
1/3 cup honey
1 tablespoon granulated sugar
pinch of salt

Pour the milk into a bowl or pot and sprinkle gelatin evenly and thinly over the milk (make sure the bowl/pot is cold by placing the bowl/pot in the refrigerator for a few minutes before you start making the Panna Cotta). Let stand for 5 minutes to soften the gelatin.

Pour the milk into the saucepan/pot and place over medium heat on the stove. Slice the skin of the vanilla bean lengthwise and scrape out insides. Place insides and skin into milk. Heat this mixture until it is hot, but not boiling, about five minutes. (I whisk it a few times at this stage). Remove the skin of the vanilla bean.

Next, add the cream, honey, sugar, and pinch of salt. Making sure the mixture doesn't boil, continue to heat and stir occasionally until the sugar and honey have dissolved 5-7 minutes.

Remove from heat, allow it to sit for a few minutes to cool slightly. Then pour into the glass or ramekin. If layering with gelee refrigerate for a few hours to solidify the Panna Cotta. If not layering, refrigerate at least 6 hours or overnight, add garnishes and serve.


Fruit Gelee

1 cup fruit (strawberries, raspberries, mango, blackberry, etc.)
*Note: Certain fruits interact with gelatin and stop it gelling like pineapple and kiwi etc.
3 tablespoons water
1/4 cup granulated sugar
1� teaspoons unflavored powdered gelatin

Sprinkle gelatin over water. Place fruit and sugar in a small saucepan and simmer until sugar has dissolved. Now mix the gelatin into the strawberry mixture and stir until gelatin has dissolved.

Remove from heat and allow to cool (close to room temp, again, if you're planning on layering or pouring on top of your Panna Cotta, a hot mixture will also heat up your chilled Panna Cotta).


Dark Chocolate Florentine Cookies
Source: meals.com

2/3 cup unsalted butter
2 cups quick oats
1 cup granulated sugar
2/3 cup all-purpose flour
1/4 cup dark corn syrup
1/4 cup whole milk
1 tsp vanilla extract
pinch of salt
1� cups dark or milk chocolate

Preheat oven to 375�F. Prepare your baking sheet with silpat or parchment paper.

Melt butter in medium saucepan; remove from heat. Stir in oats, sugar, flour, corn syrup, milk, vanilla extract and salt; mix well. Drop by level teaspoons, about 3 inches apart, onto prepared baking sheets. Spread thinly with rubber spatula.

Bake for 6 to 8 minutes or until golden brown. Cool on baking sheets on wire racks. Peel cookies from sheet.

Microwave chocolate morsels in medium, uncovered, microwave-safe bowl on medium-high power for 1 minute; stir. Morsels may retain some of their original shape. If necessary, microwave at additional 10 to 15-second intervals, stirring just until morsels are melted. Spread thin layer of melted chocolate onto flat side of half the cookies. Top with remaining cookies to make sandwiches. Or drizzle chocolate over individual cookies.

Thursday, 24 February 2011

Stromboli


I've had stromboli on my top 100 list for a while but for some reason I haven't even thought about making it. I think that when I think about baking I usually think about sweets and sweet breads, because I suddenly realized that even though I am fasting from sugar (or was when I made this) I can still bake and I can still bake things on my top 100 list.

This was a fantastic dish! It took a bit more work that homemade pizza but not much more, and it tasted delicious. We had it for dinner that night, and then as leftovers for the next two days. I thought the leftovers tasted even better than the first meal (I reheated in the oven for about 12 minutes). Enjoy!

Making the pizza dough by hand was a bit sticky . . .

Sauteing the veggies and adding in the sausage . . .

Punching down the dough and getting it divided and rolled out . . .
 

Filling and rolling the dough . . .

The almost finished and finished product . . . 
(You can see that practice does make perfect! For the first stromboli, I put the somewhat warm sausage mixture right on the dough which proceeded to heat up the dough causing it to thin and stick to the counter. For the second stromboli, I put the ham, pepperoni, and olives first creating a barrier.)

Stromboli
Source: Adapted from Food Network

Basic Pizza Dough, recipe follows
1/2 pound Italian sausage
1 cup sliced yellow onions
1/2 cup thinly sliced red bell peppers
1/2 cup thinly sliced green bell peppers
2 tablespoons minced garlic
1 teaspoon Italian seasoning
1/2 pound sliced ham
1/4 pound thinly sliced pepperoni
1/2 cup sliced black olives
2 cups shredded provolone
2 cups shredded mozzarella
1 large egg, beaten with 1 tablespoon water to make an egg wash
1 cup finely grated parmesan

Make the pizza dough first, as it has to rise for about 1 to 1-1/2 hours.

In a large skillet, cook the sausage over medium-high heat until browned and the fat is rendered, about 5 minutes. (If fatty, remove sausage with a slotted spoon and drain well on paper towels. Discard all but 1 tablespoon of fat from the pan.) If there is no sausage fat, add a few tablespoons of olive oil to the skillet. Add onions and bell peppers, and cook, stirring, until very soft, about 4 to 5 minutes. Add the garlic and Italian seasoning and cook, stirring, for 1 minute. Remove from heat and cool.

Preheat oven to 375 degrees. Grease a large baking sheet and set aside.

Punch down the dough and divide in half. On a lightly floured surface, roll out half of the dough to a large rectangle, about 9x13 inches. Leaving a 1-inch border, layer half of the ham and half of the pepperoni, overlapping slightly. Add half of the olives, half of the sausage mixture, and half of the provolone and mozzarella cheeses over the top. Using a pastry brush, paint the border of 1 long edge with egg wash. Starting at the opposite long end without egg wash, roll up the dough into a cylinder, pinching the edges to seal. Place on the prepared baking sheet and repeat with remaining ingredients. Let the dough rise, 20-30 minutes. 

Brush the top of each stromboli with egg wash. Bake until nearly completely golden brown and starting to crisp, about 20 minutes. Sprinkle each stromboli with parmesan cheese and return to the oven until the cheese is melted and the dough is golden brown, about 5 minutes.

Remove from oven and let stand 10 minutes. Slice thickly and serve.


Basic Pizza Dough
1 cup warm water
1 (1/4-ounce) envelope active dry yeast
1 teaspoon sugar
1 tablespoon plus 1 1/2 teaspoons extra-virgin olive oil
3 cups all-purpose flour
1 teaspoon salt

In a large bowl, combine the water, yeast, sugar, and 1 tablespoon oil and stir to combine. Let sit until the mixture is foamy, about 5 minutes.

Add 1 1/2 cups of the flour and the salt, mixing by hand until it is all incorporated and the mixture is smooth. Continue adding the flour, 1/4 cup at a time, working the dough after each addition, until all the flour is incorporated but the dough is still slightly sticky. Turn the dough out onto a lightly floured surface and knead until smooth but still slightly tacky, 3 to 5 minutes.

Oil a large mixing bowl with the remaining 1 1/2 teaspoons olive oil. Place the dough in the bowl and turn to oil all sides. Cover the bowl with plastic wrap and set in a warm, draft-free place until nearly doubled in size, 1 to 1 1/2 hours.

Sunday, 20 February 2011

Three Apple Salad


I think this post might be more about photos than about food. Let me just say that my photo of the finished product does not look like the professional photo at all! In fact, you could more aptly name mine the "Ghost of the Three Apple Salad". I guess you'd have to see the professional photo to know and compare (it is from a recipe card I picked up many years ago), and since you can't see it I will try to describe it to you. 

In the professional photo there is a lovely dark blue plate with some green leaf lettuce as the salad base. All the different apple colors are shown in their glory, red, green, and yellow all peeking out (hence the three apple salad). The cheddar cubes pop, as do the walnuts and carefully placed dried cranberries. And the dressing looks as though it is strategically painted on a few apples here and a few cheese cubes there. Seriously. 

Now look back at my photo. White background, white plate, GREEN leafy lettuce, and pasty white ghost salad. In my defense, you could see the different colors much better before I mixed the dressing up with the other ingredients. And again, one more reason why I am not paid for my photography skills or lack thereof. Enjoy!
Three Apple Salad
3 apples (1 red, 1 yellow, 1 green), diced to measure 2 cups
3 ounces swiss, cheddar, or gouda cheese, diced to measure 3/4 cup
1/2 cup diced celery
1/2 cup dried cherries or cranberries
1 tablespoon thinly sliced green onion
1/4 cup chopped, toasted walnuts or pecans

Dressing:
1/2 cup plain yogurt
1/4 cup mayonnaise
1 teaspoon frozen apple juice concentrate
1 teaspoon lemon juice
4 lettuce leaves (optional)

In a medium bowl, combine apples, cheese, celery, cherries, green onions, and nuts.

For dressing, in a small bowl stir together yogurt, mayonnaise, apple juice concentrate, and lemon juice. Toss gently with salad. Serve on lettuce leaves, if desired.

Makes 4 servings

Thursday, 17 February 2011

Almond Cookies


These are the almond cookies that I baked for my middle layer of my last Daring Bakers challenge. They are yummy by themselves, and I have found that they also freeze pretty well. Enjoy!

Almond Cookies
Source: Taste of Home

1 cup shortening
1/2 cup plus 3 tablespoons sugar, divided
1/4 cup packed brown sugar
1 egg
1 teaspoon almond extract
2 cups all-purpose flour
1-1/2 teaspoons baking powder
1/8 teaspoon salt
3 tablespoons sliced almonds

In a small bowl, cream the shortening, 1/2 cup sugar and brown sugar until light and fluffy. Beat in egg and almond extract. Combine the flour, baking powder and salt; gradually add to creamed mixture and mix well.

Shape into 1-in. balls. Roll in remaining sugar. Place 2 in. apart on ungreased baking sheets. Flatten with the bottom of a glass. Press three almond slices into the center of each.

Bake at 350� for 9-11 minutes or until edges are lightly browned. Cool for 2 minutes before removing to wire racks. Yield: 3 dozen.

Monday, 14 February 2011

Love Letters & Lingerie (Sugar Cookies)

WARNING: Some content further down the page may be offensive to very sensitive viewers. Don't say I didn't warn you!


I have had this sugar cookie idea bookmarked for a REALLY long time. At least it feels like a REALLY long time when you bookmark it on February 15th and don't use it until February 14th of the following year. Needless to say, I can now move it out of my saved bookmarks because I finally made these cookies. Really you could make love letter cookies anytime of the year, not just on Valentine's, but I decided that these were going to be my project this year for my sweeties.

Both of them were oogling the plain sugar cookies, asking me more than once what I intended to use them for and could they just eat them already. I just about had to give away the secret to stop the hounding that was happening more than once a day. Yes, you heard that correctly, more than once a day.

In the end though they were glad they waited. And after hounding me so much, I was surprised when I came home from subbing and my husband's love letter cookie was still sitting on the plate. He told me that he ate the envelope (yes, that sounds funny to me too) but he just couldn't bring himself to eat the love letter because it was so pretty. After a short pause I gave him permission and he proceeded to bite right in. No love lost, I guess? My son on the other hand was also super impressed but a little disappointed because he didn't get a smiley face signing off his letter.

And now (remember if you easily offend you won't want to proceed further) . . .

I haven't had this sugar cookie idea bookmarked for long at all. In fact, I think it was only a week or two ago that a friend posted it on her facebook page as a link and I had to go take a peek. After looking at a few different sites I decided that I had to make these. They were fun, but it is a little disconcerting when you think about the fact that you have to take a bite out of them! Enjoy!


Love Letter Source: Slash Food
Lingerie Source: How Does She
Sugar Cookie and Royal Icing Recipe (I only did half of a batch of icing): All Betz Off

Friday, 11 February 2011

Cheesy Ham and Potato Soup


Oh my goodness! This has to be one of the best soups I've ever eaten. It is thick, rich, creamy, and flavorful. I ended up making it late one night so that we could eat it for lunch the next day but it smelled so good that we had to have a spoonful. Next thing we know we are eating a bowlful even though it was 9pm and we had already eaten dinner and were getting ready for bed. It is so good!

I adapted the recipe, and there are many other ways to adapt. You can see comments left at the original recipe site for ideas. Personally, when I get done using the chicken bouillon granules in my cupboard I am going to replace the water and bouillon with stock. Enjoy!

Cheesy Ham and Potato Soup
Source: Food.com


3 1/2 cups of potatoes, diced
1/3 cup celery, diced
1/3 cup onion, finely chopped
1/3 cup carrots, thinly sliced
1 cup ham, diced
1 cup ham, shaved
3 1/4 cups water
2 tablespoons chicken bouillon granules
1 teaspoon pepper
5 tablespoons butter
5 tablespoons flour
2 cups milk
2 cups cheddar cheese, shredded

Combine potatoes, celery, onion, carrots, ham, and water in stockpot and bring to a boil. Then cook over medium heat until potatoes are tender. (This took about 10-15 minutes.) Stir in the chicken bouillon and and pepper. (You can choose to add salt to taste (no more than 1/2 teaspoon) but I chose not to because the ham and bouillon are both salted.)

In separate saucepan, melt butter over medium-low heat. Whisk in flour and cook stirring constantly until thick. Slowly stir in milk as not to allow lumps to form and all milk is added. Continue to stir until thick (4-5 minutes). Add in cheese and stir until melted.

Stir the cheese mixture into the stockpot and cook until heated through.

Tuesday, 8 February 2011

Green Smoothie


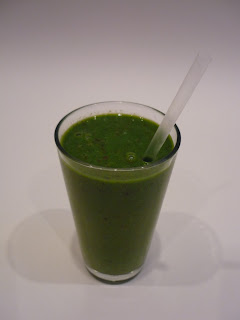
Great tasting and healthy for you! You can't go wrong with a green smoothie. I know this may not sound appealing to some of you, but you should at least give it a try before you form an opinion of it. I was a bit hesitant at first, but once I tried it I found I really enjoyed it. I've now converted 4 of my family members from totally resistant, to trying, to drinking them at least 4 times a week. Enjoy!

Side Note: We usually drink a smoothie in place of a meal. We've had them for breakfast, lunch, and dinner. If you drink it by itself it doesn't have much staying power, but you will be amazed at how much one slice of whole grain toast with your smoothie will fill you up more than just the smoothie itself. 

Green Smoothies
Makes a single serving

Base to start with:
20 large grapes or 25 small grapes
3/4 cup fresh pineapple, chunked
2 cups spinach leaves
1 tablespoon flax
6-8 ice cubes

Optional Add-ins:
1/2 banana
1/2 orange
1/2 apple
veggies or other fruits

Completely blend all ingredients.

Saturday, 5 February 2011

Aebleskivers with Chopped Apples


Every year we go to the local fair where my husband visits the stand that sells poffertjes. He usually makes 2 or 3 visits during our day at the fair because he enjoys them so much. I think that he may like the sweet whipped butter more than the poffertjes, but you can't have one without the other. When I saw an Aebleskiver pan, I knew that it would be a great purchase for our family.

We haven't had too many varieties yet, but it will only be a matter of time. For our first batch we used an apple pie filling that we had left over from a camping trip. It was fun to get our pan seasoned and to experiment with the cooking method.


Without realizing it, we also used apples for our second batch. This time though it was just finely chopped apple chunks since I wanted to make Aebleskivers but was still fasting from sugar. I know, nutella and chocolate filled sound delicious and we will eventually try those as well, but we wanted to stick with a somewhat healthy Aebleskiver for breakfast instead of dessert. These are really fun to make and taste pretty much like a little round pancake. Enjoy!


Basic Aebleskiver Recipe
Makes many little Aebleskivers!

2 cups flour
1 teaspoon salt
1 teaspoon baking soda
2 cups buttermilk
3 eggs, separated

Sift together flour, salt and baking soda. Add buttermilk and egg yolks. Beat eggs whites until light and fluffy, forming soft peaks. Gently fold egg whites into batter.

Heat Aebleskiver pan on medium heat. Grease each cup with butter and fill 2/3 full. Cook for approximately 1-2 minutes per side, flip using a toothpick. When both sides are done serve with a sprinkle of confectioner�s sugar. Best when served warm.

Optional: Fill each cup only 1/3 full with batter and place a small amount of fruit or topping in each cup and cover with an additional 1/3 batter.

Wednesday, 2 February 2011

Green Beans with Celery Bacon Sauce


I know this isn't much to look at, but it tastes so good! I love steamed green beans with nothing on them, but I find this sauce equally enjoyable. I like to steam my green beans, whereas others like to boil their beans. I have provided two different methods for making this dish. I use the first method because I usually make it with turkey bacon and I don't have much in the way of drippings. Enjoy!

Green Beans with Celery Bacon Sauce
Makes 8 servings

6 cups fresh green beans
4 bacon strips, cooked and diced
small amount of olive oil  (only if you use first method for cooking)
1 cup finely chopped onion
1 can (10 3/4 ounces) condensed cream of celery soup, undiluted
1/2 cup milk

Steam green beans. In a skillet, saute onion in olive oil until tender. Stir in soup and milk until blended; heat through. Spoon over beans. Sprinkle bacon over top.

Original Recipe:
Place beans in a large saucepan and cover with water; bring to a boil. Cook, uncovered, for 8-10 minutes or until crisp-tender; drain and set aside. In a skillet, cook bacon over medium heat until crisp. Remove to paper towels; drain, reserving 2 tablespoons drippings. Saute onion in drippings until tender. Stir in soup and milk until blended; heat through. Spoon over beans. Sprinkle bacon over top.